36 x 78 Sliding Screen Door Replacement Guide


Table of Contents
- What to Know About 36 x 78 Sliding Screen Door Replacement
- How to Measure for Sliding Screen Door Accuracy
- Custom Sliding Screen Door vs Standard: Which Fits Your Home
- Sliding Screen Door Installation Guide: Step by Step
- Adjustable Rollers and Frame Alignment
- Durability Comparison: Aluminum vs. Steel Construction
- Repair vs. Replace: When to Get a New Door
- Frequently Asked Questions
Last Updated: October 1, 2026
What to Know About 36 x 78 Sliding Screen Door Replacement
A 36 x 78 sliding screen door replacement is one of the most common home improvement projects homeowners tackle, yet it’s also where most mistakes happen. According to National Association of Home Builders, nearly 40% of DIY screen door installations require adjustment or reinstallation because the initial measurement or fit was off. The good news: with the right information and approach, you can get this right the first time.
Whether you’re replacing a worn-out door, upgrading to pet-resistant mesh, or installing a new sliding screen door replacement system, understanding your options upfront saves time, frustration, and money. The 36 x 78 dimension is the most common patio door size in North America, with both off-the-shelf and custom options available, but not all fit equally well.
How to Measure for Sliding Screen Door Accuracy
“36 x 78” is a starting point, not a guarantee. Frame height and width can vary by a quarter-inch or more depending on original installation, settling, and whether the opening is truly square.
Measuring Frame Height and Width
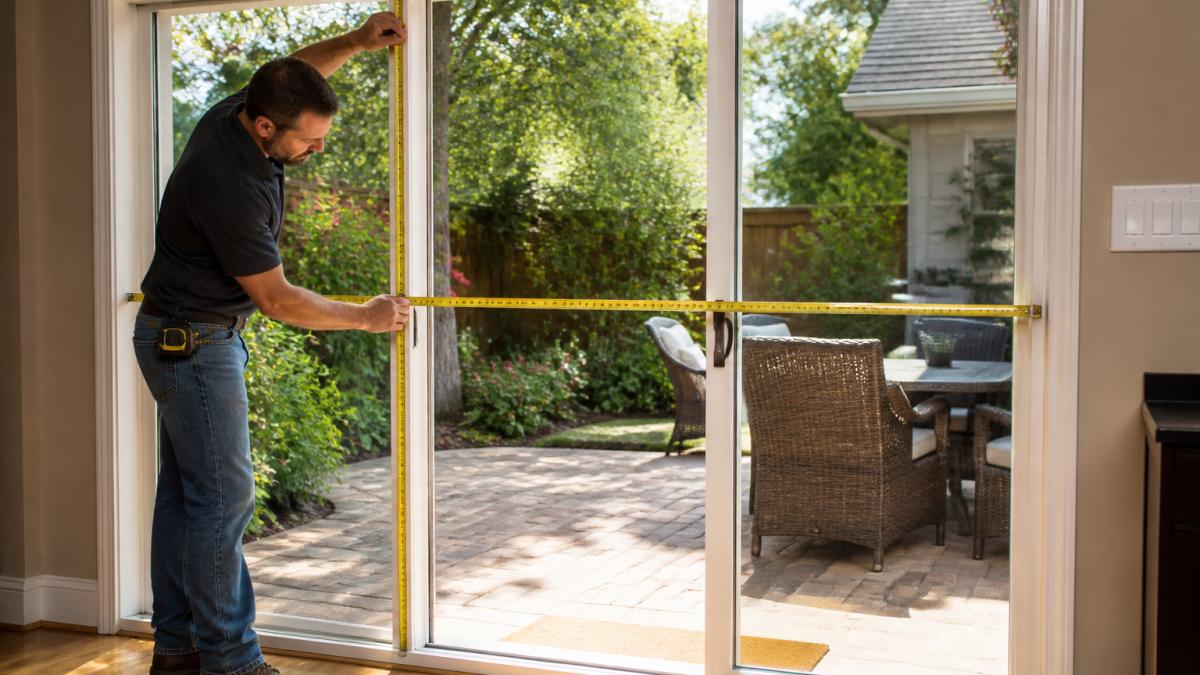
Measure the opening in three places: top, middle, and bottom for width, and left, center, and right for height using a steel tape measure. If measurements vary by more than a quarter-inch, your opening is out of square, which affects sliding screen door replacement fit.
Also measure frame depth. Most standard frames are 1.75 inches deep, but older homes may have deeper frames, affecting whether a standard door sits flush.
Check the track condition by running your finger along the bottom. Debris, corrosion, or warping affects operation. If severely damaged, track repair or replacement may be necessary before installing a new sliding screen door replacement.
Checking for Non-Standard Openings
If measurements show height between 76 and 80 inches or width between 35 and 37 inches, you’re in the non-standard zone where a generic 36 x 78 door may not fit properly. Custom options become attractive here.
If your frame has an existing door, measure it. Original installations sometimes used slightly smaller doors to account for frame irregularities, and replacing with a true 36 x 78 may create gaps or binding.
Note the frame material. Aluminum is most common, but wood frames in older homes affect installation method and hardware compatibility.
Custom Sliding Screen Door vs Standard: Which Fits Your Home
The choice between standard and custom sliding screen door replacement is a fit question, not just price. Standard doors work for truly standard openings; custom doors solve problems when your opening isn’t standard or you want pet-resistant mesh or solar screening.
When Standard Doors Fall Short
Standard doors work when your opening matches exactly. If your frame is 35.75 inches wide or 78.5 inches tall, a standard door won’t fit or will have visible gaps that let insects through.
Standard doors offer limited mesh options, mostly basic fiberglass, which tears easily with pets or children. Pet-resistant mesh, solar screening, or magnetic closures are rarely available in standard big-box options.
Standard door hardware is often one-size-fits-all, requiring frame shimming or modification that defeats the purpose of a quick replacement.
Advantages of Custom-Built Options
A custom sliding screen door replacement is built to your exact frame dimensions with adjustable height ranges (typically 78 to 80 inches) and width accommodations, eliminating gaps and binding.
Custom doors offer mesh choices: pet-resistant mesh resists claws and damage better than fiberglass, solar mesh reduces heat gain in hot climates, and magnetic closures provide hands-free operation.
Custom doors arrive fully assembled, cutting installation time by half since you’re hanging a finished product, not assembling components on-site.
The tradeoff is lead time and cost: custom doors take 1-2 weeks versus immediate availability for standard doors. Custom doors cost more upfront but fit better, last longer, and avoid returns or modifications.
| Feature | Standard 36 x 78 Door | Custom Sliding Screen Door |
|---|---|---|
| Frame tolerance | Fixed dimensions | Adjustable within range |
| Mesh options | Basic fiberglass only | Pet-resistant, solar, standard |
| Assembly | Partial, requires setup | Fully assembled, ready to hang |
| Lead time | Same day to 1 week | 1-2 weeks |
| Fit quality | Good for exact matches | Excellent for all openings |
| Installation difficulty | Moderate to high | Low to moderate |
Sliding Screen Door Installation Guide: Step by Step
Installing a sliding screen door replacement is a manageable DIY project if you approach it methodically. The key is preparation: have the right tools, understand your frame, and follow the sequence carefully.
What You’ll Need Before Starting
Gather a cordless drill, tape measure, 2-foot level, screwdriver set, shims, pencil, and caulking gun with silicone caulk for frame gaps.
Wear safety glasses and work gloves, frame edges and hardware are sharp. Have a helper available to hold the frame while you secure it.
Clear the area around your patio door to maneuver the new door and remove the old one safely.
Installation Steps for DIY Success
Step 1: Remove the Old Door
Open the old door fully. Press the release button or latch on the top of the frame and lift the door straight up. If stuck, remove any screws or fasteners first.
Step 2: Clean and Inspect the Track
Vacuum or use compressed air to remove debris, then wipe the track with a damp cloth. If severely corroded or warped, replace the track before installing the new door.
Step 3: Check Frame Alignment
Use your level to verify the frame is plumb and level in multiple spots. If out of level by more than a quarter-inch, use shims to prevent binding and ensure smooth operation.
Step 4: Position the New Door
Lift the new sliding screen door replacement into the frame and align the rollers with the track. It should sit naturally without forcing. If not, check frame level and track cleanliness.
Step 5: Secure the Door
Install mounting brackets or fasteners per manufacturer instructions, using pilot holes. Do not overtighten, as this warps the frame.
Step 6: Test Operation and Adjust
Slide the door back and forth several times. It should move smoothly. If it binds, check frame level and roller seating. Many doors have adjustable rollers underneath, a quarter-turn can eliminate binding.
Common Installation Mistakes to Avoid
The most frequent mistake is skipping frame inspection. Spend 15 minutes checking frame condition before ordering to avoid discovering level or track problems during installation.
Adjustable Rollers and Frame Alignment
Adjustable rollers on a sliding screen door replacement let you fine-tune height and ensure straight tracking without binding or rattling.
Durability Comparison: Aluminum vs. Steel Construction
Sliding screen door replacement frames come in two primary materials: aluminum and steel. Both work well, but they have different strengths and trade-offs.
Repair vs. Replace: When to Get a New Door
A worn or damaged sliding screen door replacement raises the question: fix it or replace it? The answer depends on what’s broken and how old the door is.
Frequently Asked Questions
What are the standard sizes for sliding screen doors?
The most common sliding screen door size is 36 inches wide by 78 inches tall, which fits standard patio door openings in most homes. However, many doors range from 32 to 38 inches wide and 76 to 82 inches tall. Non-standard openings are common in older homes or custom constructions. Measuring your specific door frame is essential because even slight variations prevent proper fit. Many homeowners discover their frame doesn’t match typical big-box store dimensions, making custom sliding screen door replacements a better solution.
How do I measure for a sliding screen door replacement?
Measure the width and height of your door frame opening at three points: top, middle, and bottom. Use the smallest measurement for width and height to ensure proper fit. Measure the depth of your frame to determine if you need a surface-mount or recessed installation. Check for any debris or obstructions in the track. Write down all measurements and note whether your frame is square by comparing diagonal measurements. If measurements vary by more than 1/4 inch, your opening is non-standard and a custom sliding screen door is recommended for a precise fit.
What’s the difference between a custom sliding screen door and a standard one?
Standard doors come in fixed sizes (typically 36×78) and may require adjustment or shimming to fit properly. Custom sliding screen doors are built to your exact frame dimensions, eliminating gaps and ensuring smooth operation. Custom options offer better material choices, including pet-resistant mesh. Standard doors from big-box stores often don’t fit precisely, leading to drafts, insect entry, and operational issues. Custom doors may cost more upfront but last longer, fit perfectly, and provide superior performance for homeowners with non-standard frames or specific durability needs.
Can you repair a sliding screen door, or should you replace it?
Minor repairs like replacing mesh, adjusting rollers, or fixing latches cost less and can extend a door’s life. Replace the entire door if the frame is bent, the track is severely damaged, rollers won’t adjust properly, or the door is over 10 years old. Pet damage to mesh is repairable if the frame is intact; however, repeated damage suggests upgrading to pet-resistant mesh. If your current door never fit properly or you’re dealing with multiple issues, replacement saves money long-term. Assess whether the cost of repairs approaches 50% of a new door’s price; if so, replacement is the better investment.
How long does installation take for a sliding screen door?
Most homeowners complete DIY installation in 30 to 60 minutes for a pre-assembled door. Remove the old door by lifting it out of the track, then clean the track thoroughly. Set the new door into the track, adjust the rollers for smooth operation, and secure any hardware. Fully assembled doors shipped ready-to-install save significant time compared to doors requiring frame assembly. If your frame requires shimming or extensive track cleaning, allow extra time. Professional installation typically takes 1 to 2 hours but isn’t necessary for standard replacements if you’re comfortable with basic tools.